Posts

Showing posts from 2020

Lotsastyle Pop Up Lid Bin

Image
Hello crafty friends! It's been awhile since my last post and I miss you all! I hope you are staying safe and healthy. 💛💛 Lotsastyle contacted me and asked if they could send me this new bin with pop up lid for my craftroom, and of course I had to decorate it with my bee logo! 💛💛 This bin is perfect to store all my scraps next to my diecutting machine and paper cutter when I'm paper crafting and making cards.  And I love how the lid pops open when you tap on the top!  I chose the white bin to match my craft area, but this bin also comes in some other super cute colors. @lotsastyle_shop  is offering 30% off to my readers if you use this promo code: 30CRAFTYBEE You can shop here:   https://www.amazon.com/gp/mpc/ A1ZWU5RTPN2P4Z Happy crafty shopping my friends! 😍 Crafty hugs, Beata June 💚💚 #lotsastyle   #lotsastyletrashcan    #craftroom

New Craftroom addition 💚

Image
💛 Hi crafty friends. I hope you are all safe and healthy at home.  Today I am sharing this new addition to my craftroom… Never thought I would be excited about a trash bin! 🗑 @lotsastyle_shop contacted me a few weeks ago and asked if they could send me this cute bin for my craftroom. It was so fun decorating it with my logo (created by my amazingly talented friend Davina @popsiclesticks). 💛 Now I have somewhere to put all my scraps when I’m making my cards instead of all over the floor 😆😆  @lotsastyle_shop is offering 30% off if you use this promo code: 30CRAFTYBEE You can shop here: http://bit.ly/2MryefO Happy crafting my friends! Stay home and stay safe. 💛💛💛💛💛💛💛💛💛💛💛💛💛💛💛💛 Crafty hugs, Beata June 💚💚 #lotsastyle #lotsastyletrashcan   #craftroom

TCP March Release Blog Hop

Image
Hi crafty friends!  That's for hopping along with the Cat Pack as we celebrate release day over at The Cat's Pajamas !  You should have arrived from Brenda's blog .  Today I'm sharing 3 cards I made featuring some of the new release goodies! Still Life stamp and die bundle:  To make this card I splattered gold acrylic paint onto a 4 1/4" x 5 1/2" piece of dark blue cardstock, and added a stitched border around the blue cardstock panel.  Then I stamped the pretty flowers from the new Still Life stamp set, colored them with copic markers, cut them out using the coordinating die, and glued them onto the center of my blue cardstock panel.  Then I added with "with love" sentiment from the For Fox Sake stamp set . Silly Numbers bundle ; Let There Be Cake bundle : To make this 9th birthday card, I stamped the 9s from the Silly Numbers stamp set using light turquoise and pink ink on a 4"x5 1/4" piece of white cardstock and added a ...

TCP Sneaky Peek - Get Your Sparkle On

Image
Hi crafty friends!  Today I'm sharing a sneak peek of the new Get Your Sparkle On stamp set , available over at The Cat's Pajamas store ! To make this card, I cut out the flower banner for the bottom of my card from blue cardstock using the new Liners Too Die which will be available in this month's release! Then I cut out the best wishes sentiment from blue cardstock using the new Best Wishes Die also available in the new release.  I glued those die cut pieces onto my white card panel (4"x5 1/4") and added a stitched border around the panel.  Then I stamped the dancing bunny from the Get Your Sparkle On stamp set , colored it the with copic markers, cut out my colored image, and glued it over my flower banner.  Lastly, I glued my card panel onto my blue A2 card base. I hope you like this card and go check out more sneaky peeks over at The Cat's Pajamas blog ! And remember to leave a comment here for a chance to win a $10 voucher to the TCP on...

TCP Sneaky Peek Day - Super

Image
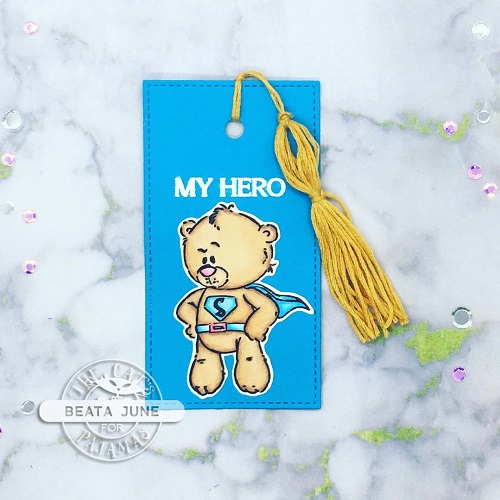
It's sneaky peek week over at The Cat's Pajamas and today I'm giving you all a look at a papercraft project I made using the new Super stamp set .  This new set is suuuuuuper cuuuute! To make this bookmark, first I cut our a rectangle piece of blue cardstock and added a stitched border to it.  Then I stamped the superhero bear from the Super stamp set , colored it with copic markers, cut out my colored image, and glued the bear to my blue rectangle cardstock.  I stamped the "MY HERO" sentiment from the Super stamp set with versamark ink and heat embossed it with white embossing powder.  Then I punched a hole at the top of my rectangle for the tassel to go through.  Next I made my tassel with gold embroidery thread.  ( Click here to check out my prior blog post for a tutorial on how to make the tassle for the bookmark. ) I love all the cute images on this new Super stamp set .  It's available for purchase now over at the TCP store ! ...

TCP Challenge #366 Reminder - Furry Animals

Image
Hi crafty friends!  Have you had a chance to link up your furry animal card over at The Cat's Pajamas blog ? Go link up your project for a chance to win a $50 gift voucher to the TCP online store ! Here's a card I made featuring the fuzzy caffeine loving bunny from the Make Tea stamp set : To make this card, I stamped the fuzzy coffee loving bunny and tiny mouse from the Make Tea stamp set , and the coffee cup from the Year of the Rat stamp set , colored my stamped images with copic markers, and cut them out. I stamped the "Keep Calm Put the Kettle On" sentiment from the Make Tea stamp set onto some patterned notebook paper with blue ink, and then glued on my colored images below the sentiment.    You still have time to link up your furry animal card over on the TCP blog .  A few reminders about the TCP challenge: Each month a new challenge will be posted on The Cat's Pajamas blog  and the TCP Facebook page . If you want to play along you...

TCP Turesday Challenge #366 - Furry Animals

Image
It's the first Tuesday of the month and that means there's a new challenge happening over at The Cat's Pajamas blog !  This month's challenge theme is furry animals.  For my furry animal project, I used the Make Tea stamp set to make this card: First, I cut a piece of gingham pink patterned paper (4"x5 1/4") and glued it to my white A2 card base.  Then I stamped my fuzzy bunny from the Make Tea stamp set  and colored the fuzzy guy with copics.  I cut out a stitched oval from white cardstock, and glued my colored bunny to the bottom of the oval.  Then I stamped the "You warm my heart" sentiment from the Make Tea stamp set  above my bunny, and glued on some pink holeless sequins from the sherbet holeless sequins pack .  Then I adhered my white stitched oval over my gingham patterned paper using foam tape for some dimension.  I hope you go find some of your cute furry critter stamps and make a project to link up over at the TCP blo...

TCP Stencil Challenge Reminder

Image
Have you entered into this month's Tuesday Challenge over on The Cat's Pajamas blog ?  This month's challenge theme is Stencils! This card features the TCP Twist Stencil : To make this card I stamped the bunny and rain cloud from the Look for the Rainbows stamp set onto the center of my card base.  Then I used the Twist stencil  to blend various distress oxides using the Big Beautiful Blending Brush to make the rainbow background around my bunny.  Then I stamped out another bunny and rain cloud on a separate piece of white cardstock, colored them with copic markers, cut them out, and then glued them onto my card base.  Then I colored the raining hearts with copics, and added white accents to my colored images using a white gelly roll pen.  To finish off my card I stamped the "Take Time To Look For the Rainbows" sentiment from the Look for the Rainbows stamp set and added a stitched border. There's still time to enter this month's stencil c...

TCP Tuesday Challenge #365 - Stencils

Image
Happy Tuesday crafty friends!  It's the first Tuesday of the month, which means a new Tuesday Challenge is starting over at The Cat's Pajamas blog .  This month's challenge them is stencils! This card features the Great Outdoors Stencil , and Grab the Unicorn and Look for the Rainbows stamp sets: To make this card, I made the clouds with the Great Outdoors Stencil  by blending distress oxide inks (Salty Ocean, Shaded Lilac, Victorian Velvet, and Picked Raspberry) using the Big Beautiful blending brush .  Then I stamped the unicorn holding the umbrella under some a rain cloud from the Grab the Unicorn  stamp set, and colored it with copic markers, cut it out and glued it over my blended cloud background.  Then I stamped the "You Make Rainy Days Brighter" sentiment from the Look for the Rainbows stamp set.  Next I glued a blue border around my card.  Then I glued some holeless sequins to finish off my card.   Are you rea...

The Cat's Pajamas January Release Blog Hop

Image
Hi crafty friends!  I hope you've been tuning in this week for all of The Cat Pack's sneaky peeks of the new release. Today is new release day over at The Cat's Pajamas which means it's time for a blog hop! You should have arrived here from Melissa's blog . For today's hop, I am super excited to share three cards I made featuring the Hello Spring stamp and die bundle , and Follow the Bunny stamp and die bundle . Hello Spring stamp and die bundle: To create this card, I cut out a 4" x 5 1/4" piece of white cardstock for my card panel.  I used the Greet Outdoors stencil to make the grass and clouds by blending distress oxides (Grass: Mowed Lawn; Clouds: Broken China, Spun Sugar, and Ripe Persimmon) onto my white card panel using the Big Beautiful Blending Brush .  Then I stamped and colored the critters, flowers/plants and little boy from the Hello Spring stamp set with copic markers , cut them out with the coordinating die, and glued them ...

Year of the Rat - TCP Sneaky Peek

Image
Hi crafty friends! I'm so excited to share a sneaky peek of the new Year of the Rat stamp and die set from this month's new release over at The Cat's Pajamas ! I had so much fun making this card with this new bundle!  To make my card, I first stamped the adorable mouse on the cloud and bird onto the center of my white card base and also stamped on the fluttering butterfly onto my white card base.  Next, I cut out masks of the mouse and bird and butterfly using the coordinating die set to cover my stamped images. Then I blended distress oxide inks (broken china and chipped sapphire) around my stamped images, and splattered the inkblended card base with water and blue acrylic paint.  Next, I removed my masks and colored my stamped images with copic markers .  To finish off my card, I heat embossed the Hello sentiment from this stamp set with versamark ink and white embossing powder on dark blue cardstock, and cut out a flag with the sentiment, and adhe...

Splish Splash! The Cat's Pajamas Sneaky Peek

Image
Greetings crafty friends!  It's sneaky peek week over at The Cat's Pajamas !  This week we're giving you some peeks of this month's new release! Today I'm sharing a card I made featuring the new Splish Splash stamp set : To make this card I stamped the girl holding the umbrella over the boy on the middle of a white card panel (4" x 5.25") and colored with copic markers . Next, I drew in some green bushes and water puddles with copics .  To make the rain, I used different blue shades of copic markers (B00, B01, B02, B34) and drew diagonal dashes across my card panel (starting with lighter shades to darker blue).  Then I took a white gelly roll pen and added more diagonal lines and dots to add to the splashing rain look.  Next, I stamped the "You're the Splish to my Splash" sentiment to the top right corner of my card panel. To finish off my card, I added a dark blue border on top of my card panel, and then glued the panel on top of...

Coffee Loving Cardmakers & The Cat's Pajamas Collaboration Hop - Make Tea!

Image
Today we share inspiration featuring this adorable new “Make Tea” set with the Coffee Loving Cardmakers team!  Hop along with the Cat Pack and the Coffee Loving Cardmakers team as we share some tea-lightful projects with you.  Make sure to leave comments along the way as one lucky commenter will have the opportunity to win a fab prize from The Cat’s Pajamas!   Here is the card I made for this hop with the new Make Tea stamp set : To make this card, I splattered gold paint on a piece of dark blue cardstock (4.25" x 5.5").  As I waited for the paint to dry, I stamped my bunny in the tea cup and mouse, colored them with copic markers , and glued them onto the splattered blue cardstock.  Then I heat embossed the "Keep Calm put the kettle on" sentiment from this stamp set onto black cardstock with white embossing powder, and then cut it out and adhered it to the top of my blue cardstock.  Then I glued my blue cardstock onto my card base.  I lov...

TCP Spring Cleaning Sneaky Peek & Spring Forward Tuesday Challenge Reminder

Image
Hi crafty friends!  It's the first day of sneaky peeks of the January new release over at The Cat's Pajamas !  And there's still time for you to play along in this month's Spring Forward challenge over on The Cat's Pajamas blog .  Head on over to link up your spring cards for a chance to win a $50 gift voucher to the TCP store !   Today I am sharing this card featuring the new Spring Cleaning stamp and die bundle from the January new release which is now available for purchase over at the TCP online store ! To make this card I first stamped the cleaning images (detergent, cleaning spray, laundry basket, and laundry machine) from t he Spring Cleaning stamp set , colored them with copic markers, and cut them out with t he coordinating dies .  I set those aside, and then drew a large circle on my A2 card base, and then drew smaller circles inside my large circle with copic markers .  I used copic markers to color inside the large and small circles to ...
Image
Hi crafty friends!  Today I'm sharing this "Happy Bird Day" card I made featuring the Baby Birds stamp by Paper Smooches . Aren't these little birdies so adorable???   To make this card, I stamped the cute birdies from the Paper Smooches Baby Birds stamp set onto white cardstock using my misti and Memento Tuxedo black ink, colored them with various copic markers, cut them out and set the colored images aside.  I cut a 4 1/2" x 5 1/2 card panel from white card stock and drew grass on the bottom of the card panel using copic markers (G82, G12, YG06).  Then I lightly blended distress oxides (spun sugar, tumbled glass, shaded lilac) with a stencil to make the cloud background.  Next, I glued on the colored birdies to my card panel.  To finish off my card, I stamped the "Happy Bird Day" sentiment from the Baby Birds stamp set, drew a speech bubble around the sentiment, colored it with blue colored copics, and adhered it to my card base above the bi...

The Cat's Pajamas Spring Challenge

Image
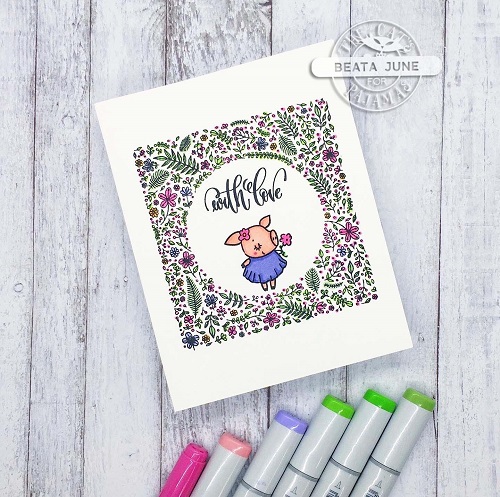
Hi crafty friends!  It's Tuesday and it's a new month and that means there's a new challenge over a t  The Cat's Pajamas blog .  This month's challenge theme is Spring Forward! For the Spring Forward challenge, I made this card using The Cat's Pajamas  Hay Neighbor , Year of the Pig , and For Fox Sake stamp sets: To make this card I stamped the floral frame from the  Hay Neighbor  stamp set onto my my white card base (4.25"x5.5"), and colored the flowers and leaves with copic markers.  Next, I stamped the sweet piggie holding a spring flower from the  Year of the Pig  stamp set inside my floral frame and colored her up with copics.  Last, I stamped the "with love" sentiment from the  For Fox Sake  stamp set with black ink. Are you ready to spring forward?  If so, head over to The Cat's Pajamas to link up your Spring Forward project for a chance to win a $50 voucher to the TCP store! A few reminders about ...