Posts

Showing posts from 2019

TCP New Release Blog Hop

Image
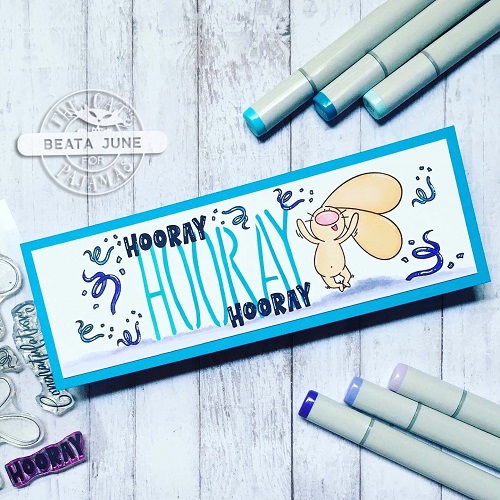
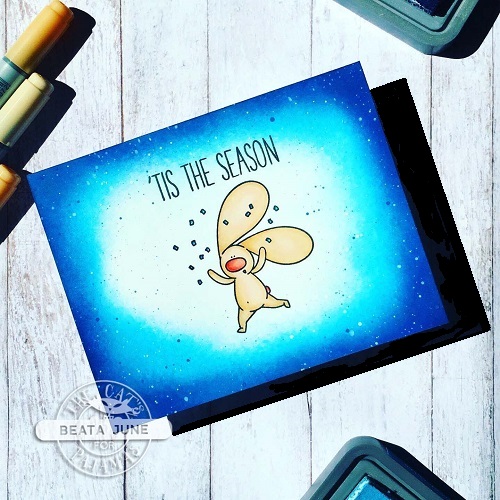
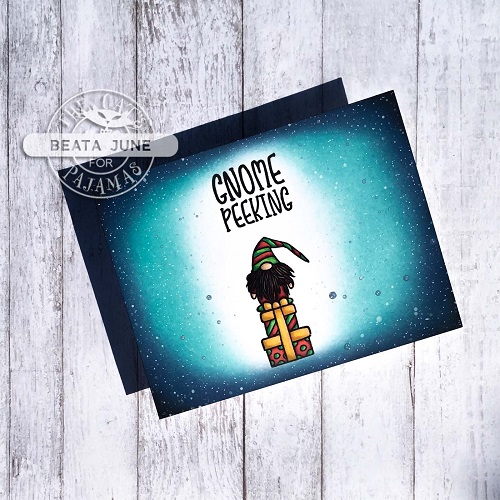
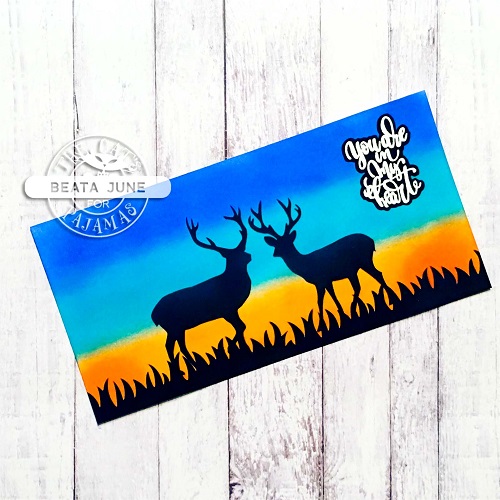
Wahoo! It's release day over at The Cat's Pajamas which means The Cat Pack is doing a blog hop! You should have hopped over here from Julee's blog . I'm so excited to share the cards I made with some of the new release goodies!!!  I had so much fun with this release that I couldn't stop playing with everything, and made four cards for today's blog hop! My first card features the Hello Darlin' stamp set and Shakey Serif stencil : To make this baby card, I used my Big Beautiful Blending Brush and the Shakey Serif stencil to blend the ABCs to the top and bottom of my white card panel with distress oxide ink (mermaid lagoon).  Then I stamped the zebra and "HELLO darlin'" sentiment to the center of my card and colored the zebra and heart with copic markers.  I drew in the ground for the zebra with copics.  Then I glued my white panel onto my light blue card base. My second card features the new Pattern Builder & Stripes and Plaid st

TCP Sneaky Peek - Winning Stamp set

Image
Yippee! It's another sneaky peek day over at The Cat's Pajamas.  Today I'm sharing two cards for this sneak peek of the new "Winning" stamp set featuring my favorite TCP bunny. My first card features the Winning stamp set and new  Skinny Alphabet stencil : First I used my Big Beautiful Blending Brush and the Skinny Alphabet stencil to blend the HOORAY sentiment to the background of my card using distress oxide ink (mermaid lagoon).  Next I stamped the smaller "HOORAY" sentiments from the Winning stamp set above and below my stenciled HOORAY background with navy blue ink, and added highlights with a white gel pen.  Then I stamped the jumping bunny and confetti throughout my card from the Winning stamp set .  I colored the stamped images with copic markers, and then glued my colored panel onto a long horizontal blue card base. My second card features the Winning stamp set and new  Skinny Numbers stencil : To make this New Years holiday car

TCP Sneaky Peek Day #5 - Stencil Day!

Image
It's Day 5 of sneaky peek week over at The Cat's Pajamas! And today we are sharing sneak peeks of the new Stencilz available in this month's new release. This is a card I made using the new Handdrawn Scrolls stencil : To make the patterned background for my card, I cut a 4" x 5 1/4" piece of white cardstock and colored in the patterns from the Handdrawn Scrolls stencil with copic markers, and glued it onto my light purple card base.  Then I stamped, colored and cut out the unicorn from the Grab the Unicorn stamp set , and glued that onto a 2"x3 1/4" piece of light purple cardstock, stamped on the Happy Birthday sentiment from the Simply Said stamp set above my unicorn, and then glued onto the center of my patterned stenciled background.    Thanks for stopping by for Day 5 of Sneaky Peek week.  I hope you tune back in for more projects I made with the awesome new release by The Cat's Pajamas!   Crafty Hugs, Beata June 💚💚

TCP Sneaky Peek Day - Hugs Needed Stamp set

Image
Greetings crafty friends! It's another sneaky peek day of the new release over at The Cat's Pajamas!  Today I'm sharing a sneak peek of the new "Hugs Needed" stamp set :   This card was simple to make:  I just stamped the dog and tree and boy holding flowers from the Hugs Needed stamp set onto a white card base, and colored with copic markers!  I added a grass and sky background with my copics and that's it! This set is so adorable and my creative juices are racing with all the ideas I have to make different cards with this set! Remember to leave a comment on this post for a chance to win a $10 gift voucher to the TCP store.  Please check back in again soon for more sneaky peeks of The Cat's Pajamas' new release! Crafty hugs, Beata June 💚💚 **This post includes affiliate links to products featured in this post.  Affiliate links do not cost you anything extra at all.  Purchases through affiliate links may result in a small commission

TCP Tuesday Holiday Challenge Reminder

Image
I love the winter holidays!  This is my favorite time of year.  And what better way to get in the holiday spirit than to play along in the Holiday challenge over on The Cat's Pajamas blog! This month's challenge them is Holidays--we want to see all your November, December and January holiday-themed projects!  Here's a winter holiday card I made featuring the Santa is Coming and Bunny Christmas stamp sets: To make this card I stamped my favorite TCP bunny playing in the snow from the Santa is Coming stamp set, and the "Tis the Season" sentiment from the Bunny Christmas stamp set (I masked off the bottom portion of that sentiment).  Then I blended distress oxides (tumbled glass, broken china, and chipped saffire) around my bunny, starting with the lighter shades from the inside, and blending in the darker colors as I moved out towards the edges of my card.  Next I splattered my card with water, and blue and white paint.  To finish up the card I colored my bun

TCP Tuesday Holiday Challenge

Image
There's a new challenge over on The Cat's Pajamas blog!  This month's challenge theme is any holiday in November, December or January. I made this Christmas card featuring the Gnome Peeking stamp set: To make this card I stamped the gnome and sentiment on the center of my white card base. Next, I blended different shades of blue distress oxides around my gnome, and splattered white paint throughout to give my card a snowy look.  Last, I colored my gnome with copics.  I hope you enter into this month's TCP Tuesday challenge!  Here's a few reminders about the the challenge: Each month a new challenge will be posted on The Cat's Pajamas blog and the  TCP Facebook page If you want to play along, upload your project to The Cat's Pajamas blog page using the InLinkz button provided. You are not required to use a Cat's Pajamas stamp or die but if you have them we would love to see them. The winner will be chosen on the day of the next challenge

TCP Tuesday Challenge Reminder - "Fall"

Image
Hi friends! I'm popping by to remind you to enter all your "fall" cards in this month's TCP Tuesday Challenge.  This month's theme is fall--we want to see some type of fall element in your cards (e.g., fall activities, colors, Halloween, Thanksgiving).  Today I'm sharing a silhouette fall sunset card featuring the Birch Forest and Great Outdoors Stencilz :       To make this card I first blended my card base with distress oxides (ripe persimmon, peacock feathers and blueprint sketch).  To make the deer silhouette, I used the Birch Forest Stencil and black soot distress ink.  To make the grass silhouette, I blended black soot distress ink using the grassy side of the Great Outdoors Stencil .  Then I stamped the "You are in my heart" sentiment from the Bold Sentiments onto black cardstock with versamark ink, covered the sentiment with white embossing powder, and heated it with my heating tool.  Then I fussy cut the sentiment and glued it

New TCP Tuesday Challenge - Fall

Image
Hello October! With a new month here, that means there's a new monthly Tuesday Challenge over at The Cat's Pajamas!  This month's TCP challenge theme is Fall.  We want to see all your cards and projects featuring fall colors, fall activities, Halloween, Thanksgiving, etc. For this month's challenge, I made a Halloween card featuring the Hey Boo stamp set , woodgrain stencil, and The Neighboohood stencil : To make this card I blended my A2 card base with distress oxides (seedless preserves, spiced marmalade, and wild honey), and splattered with water.  I stamped my witch and moon from the Hey Boo stamp set  onto a piece of Neenah solar white card stock and colored with copics. I masked my colored witch and then blended the blue woodgrain background using the Big Beautiful Blending Brush and Woodgrain stencil .  Then I blended some bats with distress ink using The Neighboohood stencil , cut out the bats and glued them onto the woodgrain background.  Next, I stamped

The Cat's Pajamas September New Release Blog Hop

Image
Yippee! It's new release day over at The Cat's Pajamas and that means the Cat Pack is celebrating with a blog hop! You should have arrived here from Lynn's blog .  I'm so excited to share more cards I made featuring some of the new release goodies! My first card features the Peace, Love, Joy die , Birch Snowglobe die , and May the Forest Be With You stamp set: My second card features the Roll With It stamp and die bundle : My third card features the Meowy Christmouse stamp set which is available for purchase now, or which you may receive free with a ny purchase of $65 or more:  My last project I'm sharing is some tags for Christmas cookies I plan to bake during the holidays, featuring the Christmas Cookies CutUp dies  (cookies are glued onto a stitched rectangle I made using the Rectangular Stamp Die ):  Next kitty up is Wendy!  Head on over to Wendy's blog to see her awesome creations for The Cat's Pajamas new release blog hop! And v

TCP Sneaky Peek - Grab the Unicorn

Image
It's another sneaky peek day over at The Cat's Pajamas!  Today I'm sharing a peek of the new Grab the Unicorn stamp set .  This stamp set is sooooo adorable! How I made this card:  First, I blended differed distress oxides using the new Twist Stencil to make the rainbow background on my white A2 card base.  Then, I stamped and colored the unicorns from the Grab the Unicorns stamp set with copic markers, cut them out, and adhered them with foam tape to pop them up over my rainbow background.  To finish off my card, I stamped the "Wishing you sunshine & rainbows" sentiment from the Grab the Unicorns stamp set with black ink on some pink cardstock, cut it out and glued it underneath my unicorns.  Here's another look at my card: The Grab the Unicorns stamp set is available now over at the TCP store -- click here to purchase yours now! Hope you enjoyed this sneaky peek!  Be sure to tune in again tomorrow for The Cat's Pajamas new release bl

TCP Sneaky Peek - Feliz Navidog

Image
Hello my crafty friends!  Thanks for visiting my blog for another sneaky peek of The Cat's Pajamas new release! Today I am sharing a sneak peek of the Feliz Navidog stamp set . You can purchase this stamp set or get it free with any purchases of $65 or more over at the TCP store . To make this card, I used the Rectangle Stamp Cutup die to cut out the postage stamp frame from red cardstock and glued that onto my green A2 card base.  Next, I stamped the cute pups from the Feliz Navidog stamp set onto white cardstock and colored them with copic markers.  After I finished coloring, I cut out the "dog tree" and adhered it over my red postage frame using foam tape for dimension.  To finish off the card I stamped the "Feliz Navidog" sentiment under my postage frame on the bottom of my card. Thanks for joining in today's TCP sneaky peek! Click here to purchase the Feliz Navidog stamp set from the TCP store, or you can get this stamp for FREE with your purchas

TCP Sneaky Peek - Snapes Alive

Image
Hi crafty friends!  Thanks for joining me for a sneaky peek of some of this month's new release goodies over at The Cat's Pajamas!  Today I'm sharing a peek of the new Snapes Alive stamp set . I am a huge Harry Potter fan so this was so fun to play with! How I made this card:  First, I used the new Birch Forest stencil to make the trees in the background by blending some different shades of blue distress oxide inks using the Big Beautiful Blending Brush .  Then I flicked some water only my blended background sky, and colored my birch trees with some colored pencils.  Then I used the Wavy Stitched Border cutup die to cut out the grass from white cardstock, and used the Big Beautiful Blending Brush to blend some green distress oxide inks to make the grass.  I glued the grass to the bottom of my Birch Forest card base.  Next, I stamped and colored the Potter bunny and cauldron from the Snapes Alive stamp set with copic markers, cut them out, and used foam tape to adhere

TCP Tuesday Challenge Reminder - Layer Up!

Image
Hi friends! Popping in to remind you that you still have time to join in this month’s Tuesday Challenge over at The Cat’s Pajamas .  This month’s challenge theme is Layer Up! Here’s a rainbow card I made layering some diecut letters from the  Big, Little Alphabet Cutups die set  (inspired by a card made by Jennifer McGuire). To make this card, I first blended distress oxides (squeezed lemonade, picked raspberry, bundled sage, and mermaid lagoon) on my A2 white card base, and splattered with water.  Then I glued a white framed border on top of my card base.  Next, I die cut four of each letter for my “love” sentiment from blue, green, yellow and pink cardstock using the TCP  Big, Little Alphabet CutUps die set .  I then glued the different colors of each letter together, making sure I staggered the letters for each layer so that the color from the underlying layer peeked through.  After creating my mini rainbow layered letters, I glued my letters onto my card base to create my rai

Trifold Card with Heffy Doodle's Bots of Love stamp set

Image
Hello friends!  I'm so excited to share this trifold card I made featuring Heffy Doodle's Bots of Love stamp set.   I had BOTS of fun making this card!  I'm going nuts and bolts over this adorable stamp set! To make this card, I took an 8 1/2 x 11" piece of blue cardstock (long side facing horizontally) and made a mark 2 1/2" up from the bottom left corner, and a mark 2 1/2" down from the top right corner.  I then took my paper trimmer and matched up my two markings, and cut diagonally down my cardstock.  (You will have two diagonal pieces to make 2 trifold cards.) I took one of my diagonal pieces and scored 3 5/8" and 7 1/4" from the straight edge (diagonal cut should be on the bottom). Then I folded over my score lines and trimmed off the excess paper from the edge. I then took a lighter sheet of blue cardstock and cut 4 pieces smaller than my panels (leaving a 1/8" border), and glued them on top of the 3 inner panels and ou

Somebunny Awesome Card with Heffy Doodle Hunny Bunny Boo stamp set

Image
Hoppy Sunday friends!  Today I'm sharing a card I made for "somebunny awesome" featuring the Hunny Bunny Boo stamp set by Heffy Doodle. This stamp set is so cute, and you can use it for more than easter cards! To make this card, I first blended distress oxides on my white A2 card base.  (Distress oxides from bottom to top: mowed lawn, twisted citron, tumbled glass, and salty ocean.) I die cut my white frame using MFTstamp's Blueprints 27 die-namics, and glued that on top of my blended card base. Next, I added my sentiment from the of the Hunny Bunny Boo stamp set to the top window of my white frame.  First, I stamped the scripted "bunny" sentiment to the center of my top window with MFT Extreme Black hybrid ink.  Then I masked off the "bunny awesome" portion of the "to some bunny awesome" sentiment with a post-it, and stamped the "TO SOME" sentiment on the left side of my top window.    Then I ma