Posts

Showing posts from September, 2019

New TCP Tuesday Challenge - Fall

Image
Hello October! With a new month here, that means there's a new monthly Tuesday Challenge over at The Cat's Pajamas!  This month's TCP challenge theme is Fall.  We want to see all your cards and projects featuring fall colors, fall activities, Halloween, Thanksgiving, etc. For this month's challenge, I made a Halloween card featuring the Hey Boo stamp set , woodgrain stencil, and The Neighboohood stencil : To make this card I blended my A2 card base with distress oxides (seedless preserves, spiced marmalade, and wild honey), and splattered with water.  I stamped my witch and moon from the Hey Boo stamp set  onto a piece of Neenah solar white card stock and colored with copics. I masked my colored witch and then blended the blue woodgrain background using the Big Beautiful Blending Brush and Woodgrain stencil .  Then I blended some bats with distress ink using The Neighboohood stencil , cut out the bats and glued them onto the woodgrain background.  Next, I stamped

The Cat's Pajamas September New Release Blog Hop

Image
Yippee! It's new release day over at The Cat's Pajamas and that means the Cat Pack is celebrating with a blog hop! You should have arrived here from Lynn's blog .  I'm so excited to share more cards I made featuring some of the new release goodies! My first card features the Peace, Love, Joy die , Birch Snowglobe die , and May the Forest Be With You stamp set: My second card features the Roll With It stamp and die bundle : My third card features the Meowy Christmouse stamp set which is available for purchase now, or which you may receive free with a ny purchase of $65 or more:  My last project I'm sharing is some tags for Christmas cookies I plan to bake during the holidays, featuring the Christmas Cookies CutUp dies  (cookies are glued onto a stitched rectangle I made using the Rectangular Stamp Die ):  Next kitty up is Wendy!  Head on over to Wendy's blog to see her awesome creations for The Cat's Pajamas new release blog hop! And v

TCP Sneaky Peek - Grab the Unicorn

Image
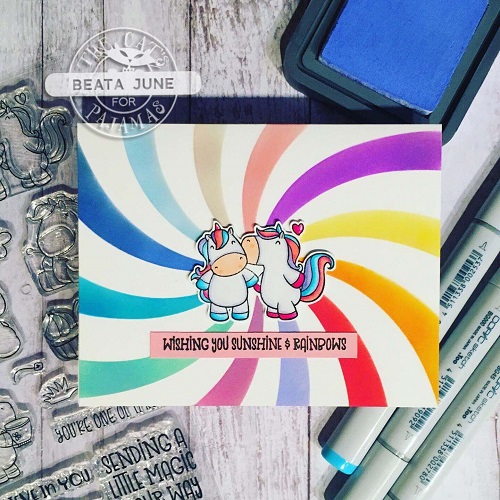
It's another sneaky peek day over at The Cat's Pajamas!  Today I'm sharing a peek of the new Grab the Unicorn stamp set .  This stamp set is sooooo adorable! How I made this card:  First, I blended differed distress oxides using the new Twist Stencil to make the rainbow background on my white A2 card base.  Then, I stamped and colored the unicorns from the Grab the Unicorns stamp set with copic markers, cut them out, and adhered them with foam tape to pop them up over my rainbow background.  To finish off my card, I stamped the "Wishing you sunshine & rainbows" sentiment from the Grab the Unicorns stamp set with black ink on some pink cardstock, cut it out and glued it underneath my unicorns.  Here's another look at my card: The Grab the Unicorns stamp set is available now over at the TCP store -- click here to purchase yours now! Hope you enjoyed this sneaky peek!  Be sure to tune in again tomorrow for The Cat's Pajamas new release bl

TCP Sneaky Peek - Feliz Navidog

Image
Hello my crafty friends!  Thanks for visiting my blog for another sneaky peek of The Cat's Pajamas new release! Today I am sharing a sneak peek of the Feliz Navidog stamp set . You can purchase this stamp set or get it free with any purchases of $65 or more over at the TCP store . To make this card, I used the Rectangle Stamp Cutup die to cut out the postage stamp frame from red cardstock and glued that onto my green A2 card base.  Next, I stamped the cute pups from the Feliz Navidog stamp set onto white cardstock and colored them with copic markers.  After I finished coloring, I cut out the "dog tree" and adhered it over my red postage frame using foam tape for dimension.  To finish off the card I stamped the "Feliz Navidog" sentiment under my postage frame on the bottom of my card. Thanks for joining in today's TCP sneaky peek! Click here to purchase the Feliz Navidog stamp set from the TCP store, or you can get this stamp for FREE with your purchas

TCP Sneaky Peek - Snapes Alive

Image
Hi crafty friends!  Thanks for joining me for a sneaky peek of some of this month's new release goodies over at The Cat's Pajamas!  Today I'm sharing a peek of the new Snapes Alive stamp set . I am a huge Harry Potter fan so this was so fun to play with! How I made this card:  First, I used the new Birch Forest stencil to make the trees in the background by blending some different shades of blue distress oxide inks using the Big Beautiful Blending Brush .  Then I flicked some water only my blended background sky, and colored my birch trees with some colored pencils.  Then I used the Wavy Stitched Border cutup die to cut out the grass from white cardstock, and used the Big Beautiful Blending Brush to blend some green distress oxide inks to make the grass.  I glued the grass to the bottom of my Birch Forest card base.  Next, I stamped and colored the Potter bunny and cauldron from the Snapes Alive stamp set with copic markers, cut them out, and used foam tape to adhere

TCP Tuesday Challenge Reminder - Layer Up!

Image
Hi friends! Popping in to remind you that you still have time to join in this month’s Tuesday Challenge over at The Cat’s Pajamas .  This month’s challenge theme is Layer Up! Here’s a rainbow card I made layering some diecut letters from the  Big, Little Alphabet Cutups die set  (inspired by a card made by Jennifer McGuire). To make this card, I first blended distress oxides (squeezed lemonade, picked raspberry, bundled sage, and mermaid lagoon) on my A2 white card base, and splattered with water.  Then I glued a white framed border on top of my card base.  Next, I die cut four of each letter for my “love” sentiment from blue, green, yellow and pink cardstock using the TCP  Big, Little Alphabet CutUps die set .  I then glued the different colors of each letter together, making sure I staggered the letters for each layer so that the color from the underlying layer peeked through.  After creating my mini rainbow layered letters, I glued my letters onto my card base to create my rai

Trifold Card with Heffy Doodle's Bots of Love stamp set

Image
Hello friends!  I'm so excited to share this trifold card I made featuring Heffy Doodle's Bots of Love stamp set.   I had BOTS of fun making this card!  I'm going nuts and bolts over this adorable stamp set! To make this card, I took an 8 1/2 x 11" piece of blue cardstock (long side facing horizontally) and made a mark 2 1/2" up from the bottom left corner, and a mark 2 1/2" down from the top right corner.  I then took my paper trimmer and matched up my two markings, and cut diagonally down my cardstock.  (You will have two diagonal pieces to make 2 trifold cards.) I took one of my diagonal pieces and scored 3 5/8" and 7 1/4" from the straight edge (diagonal cut should be on the bottom). Then I folded over my score lines and trimmed off the excess paper from the edge. I then took a lighter sheet of blue cardstock and cut 4 pieces smaller than my panels (leaving a 1/8" border), and glued them on top of the 3 inner panels and ou

Somebunny Awesome Card with Heffy Doodle Hunny Bunny Boo stamp set

Image
Hoppy Sunday friends!  Today I'm sharing a card I made for "somebunny awesome" featuring the Hunny Bunny Boo stamp set by Heffy Doodle. This stamp set is so cute, and you can use it for more than easter cards! To make this card, I first blended distress oxides on my white A2 card base.  (Distress oxides from bottom to top: mowed lawn, twisted citron, tumbled glass, and salty ocean.) I die cut my white frame using MFTstamp's Blueprints 27 die-namics, and glued that on top of my blended card base. Next, I added my sentiment from the of the Hunny Bunny Boo stamp set to the top window of my white frame.  First, I stamped the scripted "bunny" sentiment to the center of my top window with MFT Extreme Black hybrid ink.  Then I masked off the "bunny awesome" portion of the "to some bunny awesome" sentiment with a post-it, and stamped the "TO SOME" sentiment on the left side of my top window.    Then I ma

Hello Fall with Waffle Flower Hello Pumpkin stamp set!

Image
Hi crafty friends!  Summer flew by and I can't believe it's fall already! I love seeing all the beautiful fall colors during the fall season and had so much fun making this fall themed card featuring the Hello Pumpkin stamp set from Waffle Flower Crafts . I love these mice! To make this card, I first blended my A2 white card base with distress oxide inks ( squeezed lemonade , wild honey , ripe persimmon ).  After I finished blending, I splattered water and some leftover orange acrylic paint onto my blended card base, and used my heating gun to dry my card.  Next, I cut out my white stitched frame from a sheet of Neenah solar white cardstock using my Waffle Flower Moon and Stars Panel  die and glued it on top of my blended card base.   To decorate my frame, I stamped those cute little mice, leaves, pumpkins and acorns from the Waffle Flower Hello Pumpkin stamp set  using MFT Extreme Black hybrid ink , and colored my images with copic markers .  After adding some hi

Layer Up! New TCP Tuesday Challenge!

Image
Hello crafty friends!  It's a new month which means there's a new Tuesday Challenge over at The Cat's Pajamas blog! This month's challenge them is "Layer Up." Here's my interpretation of the challenge:  To make this card, I cut some purple lined patterned paper (cut to 4" x 5 1/4") and glued it to a white A2 card base.  I cut out 5 of each letter for my "HELLO" sentiment using the letters from the Big, Little Alphabet die set , and cut out the heart strip for the bottom of my card using a die from the Liners CutUp Dies set .  I blended distress oxides ( mermaid lagoon and shaded lilac ) onto one set of my diecut HELLO letters and heart strip.  I glued my blended heart strip to the bottom of my card.  Then I glued together a stack of 5 layers of letters for each letter in my sentiment, putting the blended set of my diecut HELLO sentiment for the top of the stack, and glued each of my stack of letters onto a white stitched rec